Self-Photography for Beginners-
3 Tips for Better Photos

self-photography-bsics-for-beginners-featured-image

Self-Photography - Tips for Beginners

What is self-photography?

The simple definition of self-photography is “taking a photograph of yourself”.

Why start self-photography?

Self-photography allows you to take control of every aspect of the picture and make it look exactly how you want it.

You should start taking pictures of yourself if you’re like me.
I don’t always like it when other people take my picture because I can’t achieve the specific look I like. Most people don’t understand my instructions or aren’t willing to retake the photo how I like it. The truth is that no one cares as much as I do and that can be frustrating, so self-photography is the best method to solve this problem.

What I count as self-photography:

  • Selfies;
  • Self-Portraits, meaning, carefully composed pictures taken of me, by myself with a camera or phone using a tripod/timer;
  • Photos of me, taken by someone else with MY specific instructions. I decide the location, the position of the camera, photographic plan, light, etc… It is my composition. The photographer is used as my tripod and only clicks the button.

Three tips for self-photography. Based on my personal experience:

Disclaimer: All the photo examples in this article were a result of the 3 types of self-photography mentioned above and cannot be used without my written permission.

Tip 1 for Selfies – Bet on light and look good!!!

Photography is all about control. You control everything: the light, where you will take the picture, the way you look, the props, what is in the photo and what isn’t. All is in your control. For this exact reason, I recommend you start taking selfies before moving to full body pictures. You have complete control over your face.

This approach allowed me two things. The first is to see me in the camera and how I look from all my angles. I started recognizing my pretty. What works and what doesn’t when it comes to expressions.
The second thing I noticed is how light affects my photos. Specifically, how light changes my skin tone and the environment around me.

Light for selfies:

The best light will come from a straight-on or a slight angle. Lighting from above or below creates shadows on your face.

self-photography-tipsfor-beginners-light-for-selfies: comparison light from above and light from an a straight angle

Too much light makes me look pale, almost grey. Little light makes my skin tone look off. When I photograph against the light, my environment almost disappears into the light.

Having only one light source that I can control in a dark environment has the best effect on me because I can capture my actual skin colour. I turn off the lights in my room and turn on the ring light. My face looks illuminated and not just with light. I attribute it to the fact that the light is white (I can control the light temperature) and not yellow like most house light bulbs. Natural daylight in the afternoon has the same effect.

If you don’t have a ring light you can still take amazing selfies. Just find a light source. Daylight is free and the most preferred. Find a window with good light and make sure you take your photo in the same direction from where the light is coming. In other words, you need to be facing the window.

self-photography-tips-for-beginners-ring light vs day light

The Look for selfies:

You want to look nice. The picture only mirrors what you look like, so if you don’t like the way you look, you will very likely not like the picture. Focus on your face since it is what will show the most in the picture. Expressions, eyes and lips are the most evident in selfies. Wearing eye makeup and lipstick on your lips draws attention immediately to those places and looks nice. But, the use of makeup is at your discretion.

Play with your expressions. Try the entire range of emotions on your face: playful, happy, elegant, sexy, emotionless. Become familiar with your face, your expressions, how you emulate emotion and transpire emotion in your face. When you move to full body pictures you’ll realize how knowing your angles can really make or break a photo.

This is also a great exercise for self-confidence and so much fun.

self-photography-tips-for-beginners- different posible facial expressions

Extra tip for selfies: Taking selfies with the rear camera instead of the frontal camera is better. Why? For two reasons. First, the photo will have higher quality. Second, it takes the pressure off because you’re not overanalyzing your face.

How do you take selfies with the rear camera? The same way you take a regular selfie but add a timer and turn the phone around. Voilà! It may take a few tries to look how you want it, but it’s very worth it in terms of quality. Just attribute the “bad selfies” to your learning curve.

Tip 2 for Self-Portraits – Balance your proportions

It’s hard to take a picture at eye level if you are alone unless you have an extensible tripod. If you don’t have one, you will most likely have to put your phone or camera at knee or waist level to take pictures, and that requires adjustment of proportions.

If you choose to pose sitting down your legs will look very disproportionate in relation to the head, looking much bigger. You can balance that with a few tricks. First, lean forward and your upper body will look proportional to your lower body. Also, if you sit further from the camera your whole body will be captured more evenly. I suggest you zoom in/out as needed to get your photo. Lastly, lean your phone at an angle and your angular camera will balance your proportions for you.

self-photography-tips-how to balance proportions by leaning the upper body forward

Extra tip: Clean your lenses!!!!! Always check before taking a photo if your lens is smear-free. So many shots come out blurry because the lens is dirty.

Tip 3 for Photos taken by other people with my instructions – Know exactly what you want

No one wants to take 100 pictures of you for no reason. If they do, half of them you won’t like and the other half will be blurry. So when giving instructions, be specific so that you can get the picture you want with a maximum of 20 shots. Why 20? That’s usually when my brother’s patience runs out. 😂😂😂😂😂
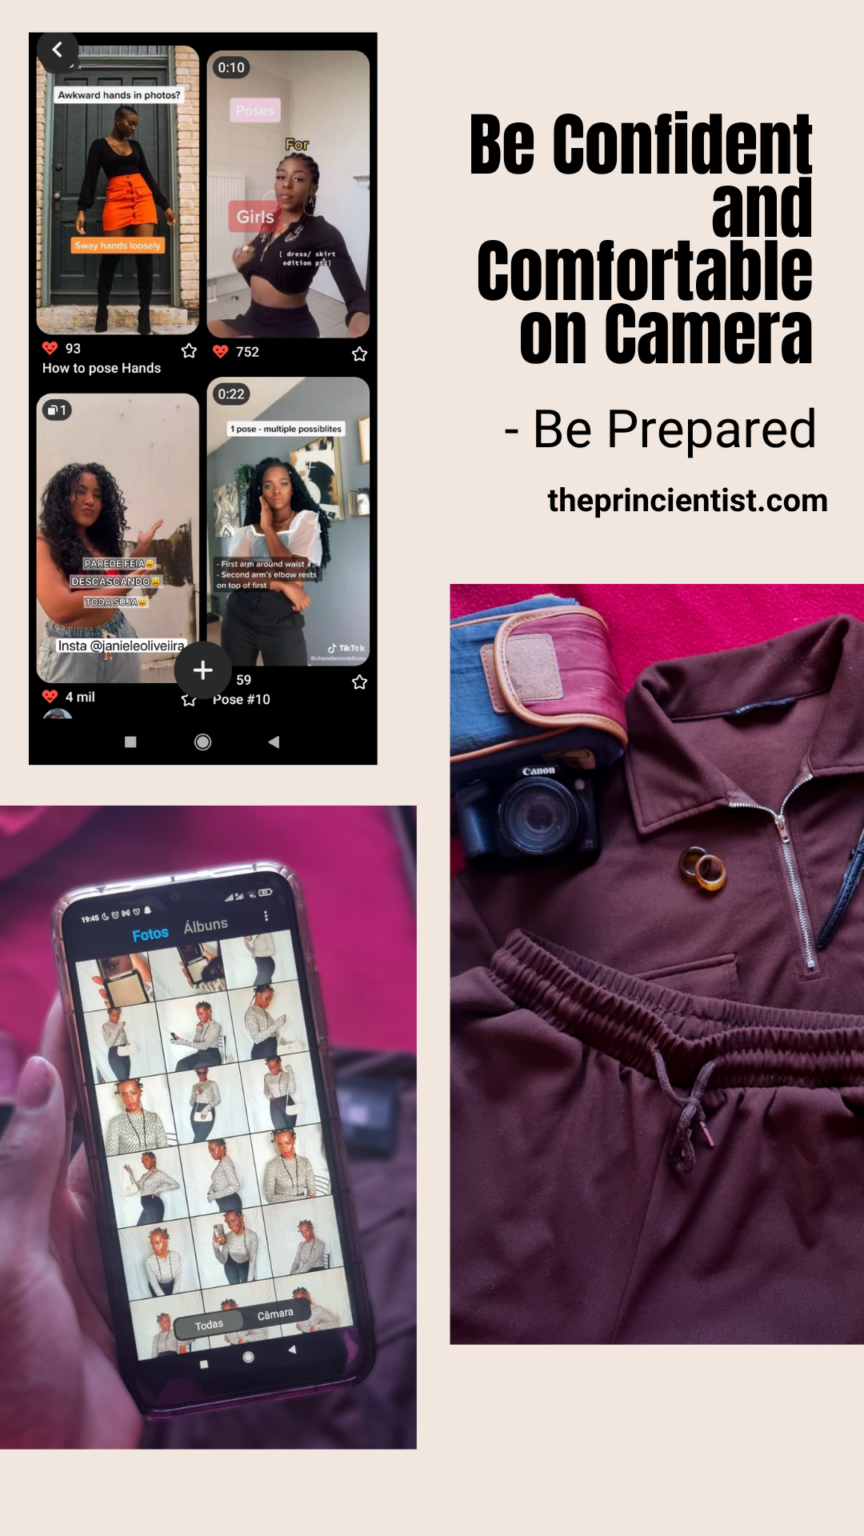
Prepare ahead these three essential things: the look, the pose, the photographic plane.

The Look:

The look is the clothes and makeup. You want to look nice. Looking good will give you the confidence to pose fearlessly. Also, and I repeat, the picture only mirrors what you look like so if you don’t like your look, you’re very likely won’t like the picture.

If you choose to wear makeup make sure it is nicely blended. A picture shows everything. The point of a photo is to capture your best self. Make sure your hair is styled nicely, and have trimmed clean nails and flattering clothes with no stains, holes or missing buttons. That’s enough to look polished no matter the style you’re trying to achieve. Prepare your clothes and equipment the day before to make sure everything looks good.

self-photography-tips-for-beginners-preprae the look the day before taking photos

The pose:

The pose is how you want to see yourself in the photo. My tip is to have a few go-to poses that you know 100% look good and pair them with a few other new poses you like. You can find new poses by looking through pictures on social media like Pinterest.

self-photography-tips-pinterest album

For posing, I advise you to look for people who look like you to manage expectations. If you’re skinny and dark-skinned, there is no point in finding pictures of a plus-size white person. That’s not how you will look in the photo so you’re bound to be disappointed. There are beautiful black girls online of every skin tone and size. Be specific. Save the pictures you like and use them as inspiration.

To make a photo your own, add a little personality with posing, use props, and use the space around you. See what works and what doesn’t.

DO NOT COPY!! When you copy, you fall into the inevitable cycle of comparison. Consequently, a great photo has more chances of being discarded because it does not look exactly like the inspo. Especially if you are copying the work of professionals, that is impossible to compare to amateurs. Use the poses you find as inspiration and adjust them to you. If the person in the inspo is sitting down, but that pose looks unfavourable in your photo, then get up and try something different. An inspo is nothing but a suggestion, not a strict guide. NO PRESSURE

Extra tip: delete the photos you don’t like only after you get home and look at them with more attention. You will give yourself more grace in regards to what the photo looks like in comparison with the inspo you had in mind.  

The Photographic Plan:

Finally, the photographic plan. The photographic plan refers to what will be captured in the photograph (you, your environment), and how close. You can take headshots (head and shoulders), medium shots (usually until the hip), full-body photos and wide-angle shots.

self photography tips - all the photographic photo plans that are possible

I suggest taking a photo in each plan in your go-to pose and asking to see the photo. Then choose the plan you like the most and begin.

Expectation Control – What to expect when you begin:

Good things: You will become more familiar with your face and body in a positive way. In time you will be able to take the exact picture you want with fewer shots. You will naturally pay attention to your surroundings and find places to photograph a lot more easily.

Bad things: Blurry pictures because you can’t see what you’re photographing. Your camera roll will be full of photos since you’re trying a lot of new things. You’ll feel embarrassed because people are looking at you.

With practice, you will overcome all the “bad” things to expect in the beginning. The more you practice, the better result you will have. There is no way around practice. Today, I can have the exact photo I want in 3-4 shots.

self photography tips - gallery filled with photos

If you’re still not sure about starting your self-photography journey consider this. Having visual evidence that you look good is a huge confidence booster. 

Standing in front of a camera confidently is an amazing confidence practice. So, don’t be intimidated and get started!

Read the post below for my best tips to help you get comfortable in front of the camera.

How To Be Confident on Camera? It’s 100% practice. There is no other way around it. But having a method and being deliberate about the actions you take help you build the confidence to succeed. Read my 7 top tips.

Disclaimer: This article is informational only. I am not a professional photographer so the knowledge presented is from my experience throughout the years. 

You Might Be Interested In

Self-Photography for Beginners – Article Series

Learn how manual/pro mode works in smartphone cameras, as well as how different smartphone camera settings affect the photos you take – ISO, Aperture, White Balance, Focus and Shutter Speed.

Smartphone or Digital Camera? Probably one of the most asked questions amongst beginners in photography. Use these five criteria to decide: Quality, Convenience, Time, Money and Ability.

Sometimes you don’t want to find a location, take all your equipment and props and photograph there. I advise you to try at home photography. For the best results, here are my 6 most useful tips.

Taking photos at home is good practice to perfect your skills. I leave you 20 at home photoshoot ideas you can try by yourself or with a subject.